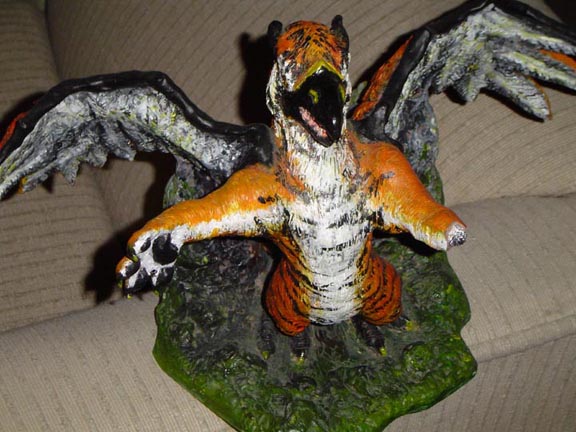
The... what? The Talcon. Created by combining a Falcon with a Tiger. How did I come up with this crazy idea? well, first off this was a project for my animal anatomy class. We had to take 2 different animals, and combine them somehow thats somewhat believeable. Sounds easy, right? well besides that, we had to draw many pictures of it, including the skeleton for it and the biggest thing of all, make a 3d sculpture of it. Now shown.
Step 1
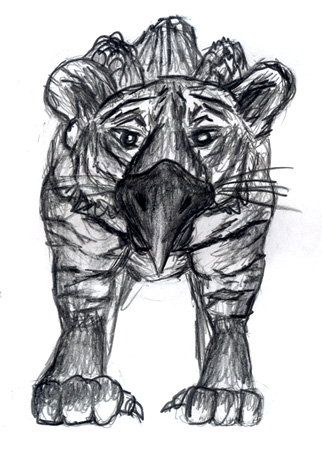
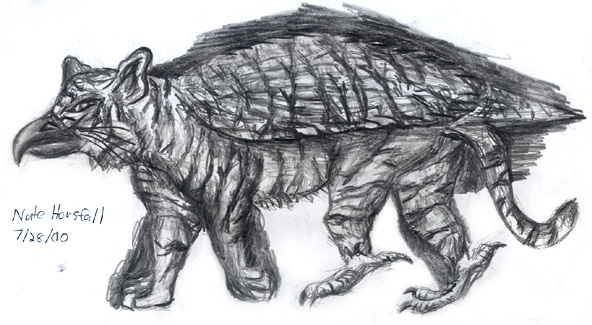
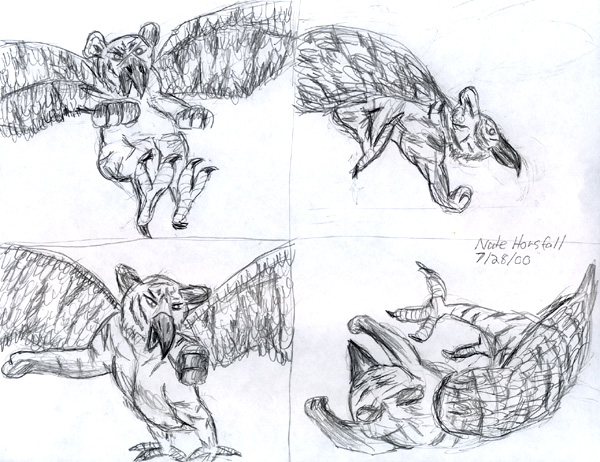
The obvious first approach, is to think about what it's going to look like. What parts will replace others? where does the bird dominate the tiger? I mean, what exactly are we looking at here? To figure this out, I went hunting through books and books to find many pictures of each animal that i could use to help me draw this right. You dont start an anatomically correct picture, without researching at least SOME anatomy. So in about a week, I came up with the required drawings. two renderings, front and side views. and 4 action poses, to figure out what exactly my creature is going to be doing that makes it interesting. It wouldnt be interesting if it was just standing there, thats boring. You need action, energy, implied movement. So i ended up going with the bottom left one, if nothing else, because the others would be near impossible to sculpt. this thing has to stand on it's own when you're done, so i had to make sure i could psychically having it DO that. Oh and in the side view, you might look at all that black around some edges and think "what the hell did he do that for? was that a mess up or what?" well actually, i did that for a vey specific reason. caking the outside edge with black, brings out the white and gives it, amazingly enough, a more 3d and real look to it. it's a very nice trick, i suggest you try it sometime if you draw.
Step 2
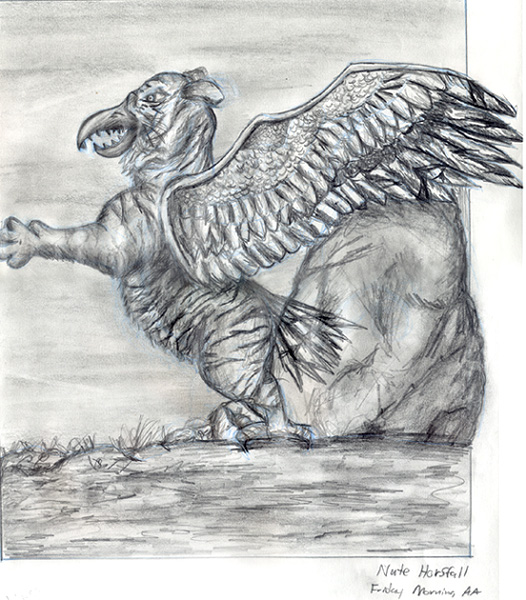
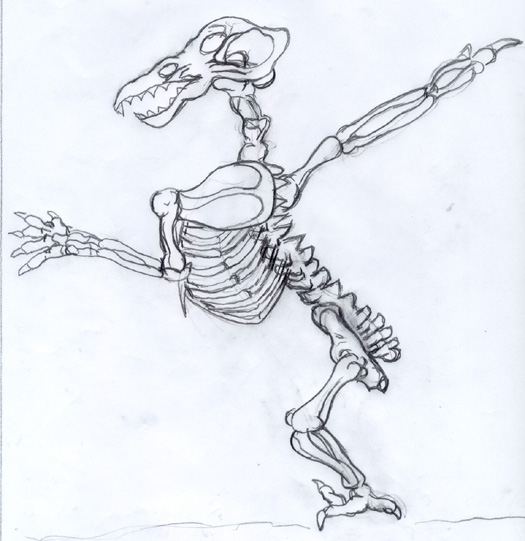
The next step, after i've fgured out WHAT it looks like, whats it's doing, and the environment for it, is to make a full rendered drawing of it in black and white. And that picture is about 10x10inches, just so you know. That of course took awhile, plus, this drawing had to be proportionally correct. Meaning that after i had it all modeled and sculpted out, it had to match the drawing. And our sculptures could only be 8 inches high, but the wings and stuff(if we had them) could go out and past the plinth(the block of wood the sculpture sits on) So not only did i have to draw it well, but it HAD to be perfect in dimensions, and the better i drew it, the more i had to go by. If that wasn't enough of a pain, then we had to overlay a piece of marker paper on it, and draw an anatomically correct skeleton for it. so where the wings start, there has to be bones connecting to the creature of course, and since mine has bird's feet for hind legs, they had to morph from tiger's to bird's, in a believeable and correct fashion. You can probably tell by looking at it, that the skelton wasn't easy to draw, and if you think it was? well lets see YOU do that then. But anyway, even though this was quite difficult, it actually improved the drawing a bit, and i also gained a far better understanding of skeletons by doing this. Very beneficial. So though it was hard, it was worth it.
Step 3
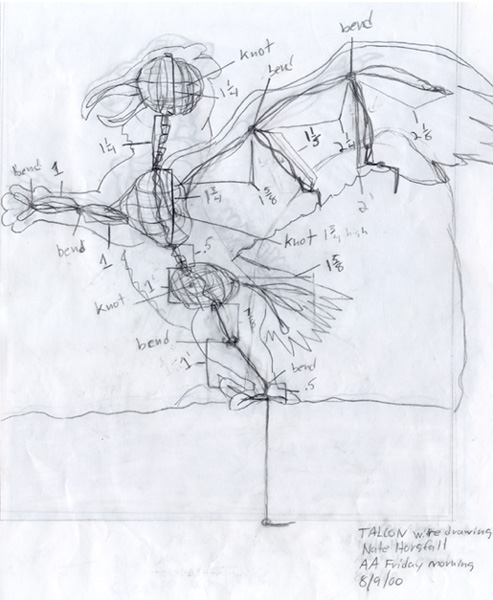
Here is a step that was big fun.. (extreme sarcasm) this is the step where we took wires, and wrapped them around OTHER wires, to creat basically a wire skeleton of it. As you can see by the drawing, again, this stuff had to be measured out carefully. The wires at the bottom and the ones coming from the wing, out to the rock, are support wires. Because you have to think, this thing is up on two legs, if it's not going to move, it needs alot of support. So we run wires up through the bottom of his feet, and out of his wings into the rocks. The wings are throws back in full, right up against the rocks, so tightly and believeable that you dont even think about there being a wire there, and it's a damn good way to hide them ^_^ But after we twisted all the wired together to make the basic shape, which was a paint in the ass to say the least.. THEN we take tinfoil and wrap the wires with that. Why? because first of all, it expands the surface area, and doesnt use any more wires. Plus, tinfoils looks alot more like muscles then wires ever will, when it's overlapped a few hundred times.. But after the tinfiol goes on, then comes the super sculpey (like clay basically) so you also need the tinfoil to take up more room, so you use FAR less sculpey (it;'s expensive.. $8 a block) and also, you dont have to bake it for like a whole day.. the more sculpey you have, the longer it takes, and the more you run the risk of things totally frying right off,
Step 4 and Step 5
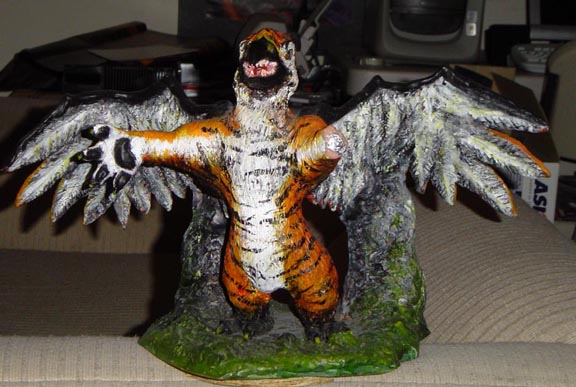
Step 4 is very simple, but very, very time consuming. It;s just sculpting the piece. you know.. carving out the eyes.. each individual feather like I had to do.. that sort of thing. We got about 2 weeks to do this, and i basically worked on it in my free time, because i can sculpt while watching TV, thats okay. But it was alot of work. i must have put 50+ hours into it. Talking about 4 or 5 per day, off and on. And remember that this is the 2nd to last step, you only stop when it has the most detail you can, or want to, put into it. Needless to say, i went crazy detailing it. But it looked damn good.
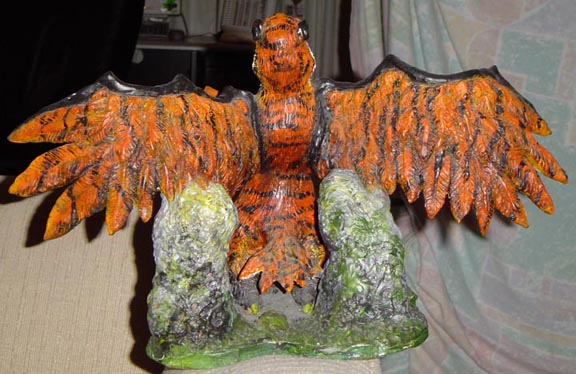
Part5 is also simple, but almost worse then sculpting it. And that, is painting it. We used acrylics for this assignment, and first i put too much water in, so i wanted a day painting basically nothing, as all the paint just dried up and evaporated, but then i had to layer it over and over and OVER to get the right color and tone that i wanted. The paint job was suppose to reflect the environment it was in, so it it's sunny, the parts lit by the sun had to be, well, lit corrrectly. So getting the golden yellow color where the sun hit, proved to be far harder then i anticipated.. And that was a paint throughout the WHOLE animal, but the wost problem should be an obvious one. The feathers. The backside of the feathers, that were the actual colored sides, was a pain because i had to lay the black stripes through there in a orderly, but chaotic way. sounds contratictory, but if you look at a tiger's stripes, thats basically how it is. neat, but random. Anyways, that was hard because of the rough textuing of the feathers wouldn't allow me to make a crisp striaght line in black.. Worse still, was the inside of the wings. The texture was so rough, i couldnt get it looking right, or holding the paint correctly, to save my own life. My teacher describes them as the look of a "german expressionist painting" And i'll have to agree! Which alot of people think is cool.. but i call it a paint job disaster. Oh well!